Saturday, September 18, 2010

"Will You Be My Bridesmaid" - Belly bands for envlopes

The Project: Will You Be My Bridesmaid? - Belly Bands for Envelopes

The Cost: ~1.00-3.00
*Mine cost me $1 because I used excess paper and bought ribbon on sale from Michaels*
 (If you use your excess paper, this project can cost as little as $1.00 for the ribbon) If you need to buy more paper, the cost can vary depending on what you choose.

The Story:
Since I went with the layered look with everything else I had to do something to these envelopes that would do them justice. I wasnt really sure what I wanted to do with my black/Brown envelopes and after a few days, I decided to basically copy the belly band idea that I did previously. I still had extra paper so I knew I wouldnt have to spend any money. When I went to Michaels for the ribbon, I bought this one on sale for .99. Works for me!! The ribbon used on my MOHs envelope was .50 from AC Moore, which  previously had from the poems.

First Things First:
**Place invites into envelopes before going on**
1. Decide what you want to do to your envelope. You may decide to just address them, throw a stamp on it and call it a day.
2. If you want to copy what I did, choose your colors.
3. Find any extra paper that you think you can use and get any new paper that you think you will need.
4. Have fun with it! If you mess up, you can always find a way to fix it. I messed up several times but figured out ways to get around it and you cant tell in the end.

What You Will Need:

1. Ribbon (.99)
2. Paper (however many you need, .59-.99)
3. Finished envelopes with invites inside!
4.Glue Runner
5.Printer
6.Any embellishments (I used flowers I already owned)

Step By Step Directions
1. Take your completed envelope, with opening in the back, and place on a flat surface.
2. Take a piece of ribbon , starting in the middle of the envelope, and wrap it around the envelope until both sides meets again. Make sure the ribbon isnt too loose*Leave some room, at least an inch to place the glue to stick to the other side of ribbon*
3. Cut.
4. Take your glue runner, and glue that inc space we left and attach it to the other side of the ribbon. Press down.
5. Take whatever color paper you will use as your base color, and pick an appropriate size for your envelope. (I made mine large because my envelopes were big). My first color was orange.
6. Once you determined your size, mark it on your paper with a ruler and cut it to that size.
7. Place the paper onto the middle of the ribbon and see if that size works for you. If its too small, make a new one. If its too big, cut it some more.
8. Cut as many more as you will need. I needed 6, so I made 6 total and placed to the side. 
9.Once you get the size you want, take your next color paper. Mine was brown. Mess with it ontop of the other paper to see how much smaller you will need.
 *As you can see, my brown paper was cut too small at first. I had to go back and do it again :-(*
10. Mark and cut the piece of paper. Make as many as you need. I needed 6.
11. Put this new piece on the first piece and see if you like how it looks. Fix it as needed, cut it more or create a new one. (I had to redo mine the first time around)
12. Set Aside.
13. Take your next color, mine was black, and measure the size you want.
14. Mark and cut to size. Double check the size.
15. Create as many as you need and place to the side in piles. I made 6.

Now Its time to put it altogether! The FUN part!- I just love watching everything come together and actually start looking as you wanted it to.

16. Take all your cut outs and place them in front of you so you can easily place them onto eachother.
17. Form basically an assembly line, you can do all 6 envelopes at once, or one at a time. I did one at a time.
18. Take your largest color paper, mine was orange and place it on a flat surface.
19. Take the next color (mine was brown) and glue the back of it with the glue runner.
 20. Once you placed glue on the back, place it onto your first paper (for me, i placed the brown onto the orange)
21. Next, do the other color (Mine was black).
22. Glue the back of the black paper.
23. Place the black paper onto the brown paper. (or whatever colors you used)
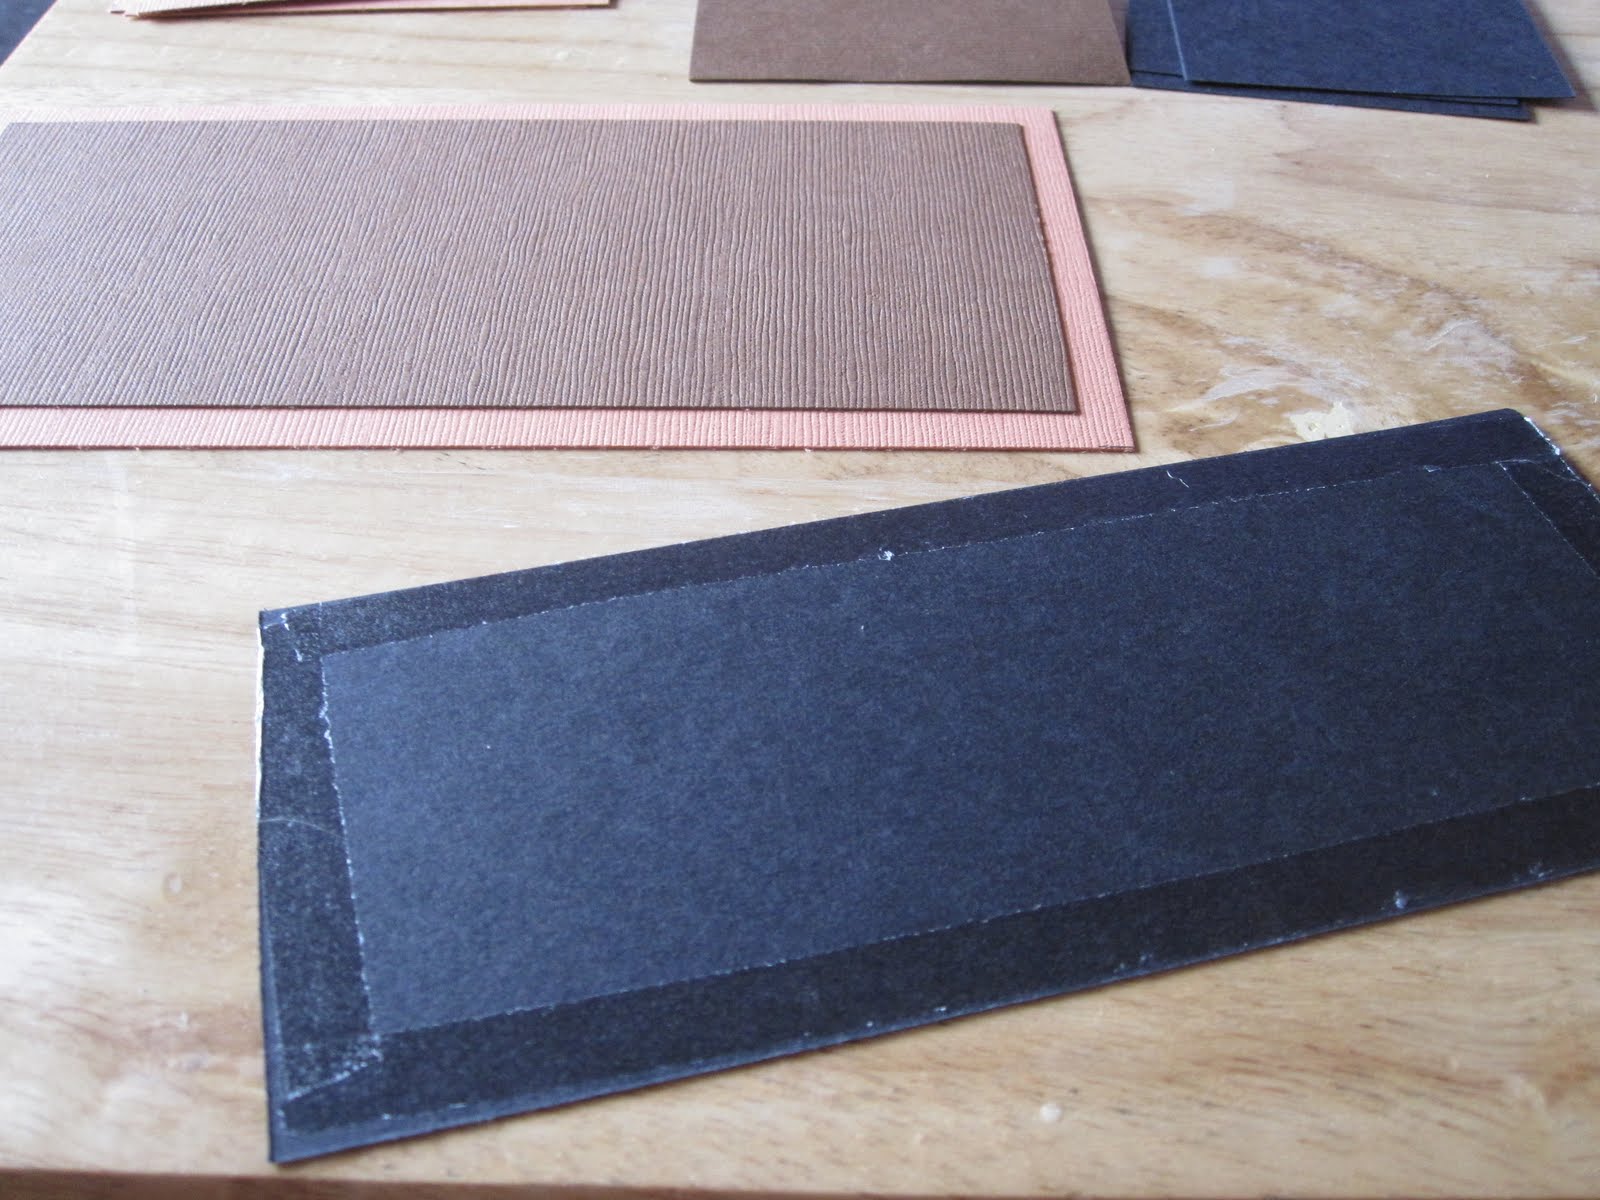
24. Do this however many times you need to do them. I did mine 6 times in this way.
25. Once you have all your layers on, its now time for the printed paper with the names on it.
26. Place the paper into your printer, write your ladies names into Word, pick colors and sizes and print out.
27. Once printed out, Cut the names off the paper to the size needed to stick onto the other layers.
28. Glue the back of the names and stick to the other layers.
29. Stick an embellishment onto the one corner. I used a flower, you can use whatever.
30. Take your finished name tags and place them onto the envelope with the ribbon around it.
31.When you have a basic idea of where it will lay, its time to glue. Glue only a line, down the middle of the bottom paper...or instead of gluing the paper, put glue on the ribbon and place the paper ontop of it.

**Do not glue the whole back of the paper. If you do, the ribbon will be stuck on the envelope and the band wont come off which means they cant see their cards!**
Finally! The whole card invite is completely done! It only took like four seperate projects! :-) BUT, well worth it, Trust me!!

**To make the label alittle different for your MOH, you can do something like I did on the black envelope. To do your band that way. This is what you can do:

1. Get a hole puncher and punch two holes on the completed name. Find the middle first on top and bottom so you have an idea where they go before you make the hole.


2. Take one end of your ribbon and place in the bottom hole.
3. Drag the ribbon around the back of the envelope and around to the front. This will give you an idea of how long your ribbon will need to be before you actually cut it.
4. When you decided how long your ribbon is to be, cut it about an inch or two longer than needed as a "just in case" kind of thing.
5. Now that you have your cut piece, place one end of the ribbon back into the bottom hole.
6. Let the ribbon hang down so you can make sure the ends hang evenly. 
7. Once they are even, take both pieces in your hand and wrap them around the back of the envelope.
8. As you come up to the top hole, place both ends of the ribbon through the hole at the same time.
9. Make sure the label looks the way you want, and then tie a bow! 
I gave these to my bestests, and they loved them. The expressions they had when they first opened them were so genuine and made me so happy!!

For more projects, and to keep up to date with all the DIY projects Ill be doing for my own wedding, check out my other posts :-)

Sunday, September 12, 2010

"Will You Be My Bridesmaid?" - Custom Envelopes

The Project: "Will You Be My Bridesmaid?" - Custom Envelopes

The Cost: $4.00 (Lakeshorelearning.com has construction paper for 1.99 in various colors. 50 sheets come in each pack, and come in two sizes. I recommend the bigger size of 12x18 because its the same price but you get more paper which you can use for other things later on) *If you buy paper anywhere else, it will be more like $4-$6.00 on average as Ive searched around for the best possible price.*

These envelopes were made using construction paper,scrapbook paper, ribbon, and glue.

The Story
Trial and Error! Those two words I have used alot along this DIY adventure. I say this because when creating these great little gifts, I never took into consideration what they would actually be placed in. An envelope! But after creating the invites, I realized, who has envelopes in the "Custom" size I just made. After a quick search, I realized I was on my own. I never made my own envelopes before but it looked as though I had no choice now. So the first thing I did was, measure the largest parts of my invite to figure out what size envelope they would need to be set into. Then, I need to find paper that I could use without using multiple sheets, this is where the construction paper came in and why I had to in paticular get the larger 12x18 size. I bought construction paper in muliple colors for future projects and also because if Im going to pay for shipping, I rather not do it multiple times.

First Things First
1. Decide what colors you want your envelopes to be, and if you will have more than one color (perhaps a different color for the MOH)
2. Order them from lakeshorelearning.com or any other store that supplie it if you dont want to wait for shipping.

What You Will Need (Sorry, I dont have a main photo for this)
1. Construction paper in whatever color you need (lakeshorelearning.com 1.99)
2.Glue (actual glue not the glue runner, the runner wouldnt stick for some reason) and Glue runner for names
3.A ruler (1.00) I already had one so its not reflected in the price.
4.A flattener (2.00) I already had one so its not reflected in my price.
5.Printer
6. Harder paper for a template,maybe oaktag (Dont make the mistake I did, I used trial and error and never bothered to create a template that I could keep for further use on other projects)

Step By Step Directions - I apologize for all the steps in this one, but it took awhile to figure out what to do and to actually put together so this part will be described in detail with many pics. Hope it helps! This can also be used to make any size envelopes you want if you ever need for anything else!

A few things to remember that you may not have taken into consideration until it was too late:
1. The envelope needs to be bigger than the actual invite so it slides in an out easily
2. If you want a flap at the bottom and top, remember to leave more space at the top and bottom. (use your eye to determine whats enough, there is no right or wrong dimension)
3. Leave space for the envelope to be glued to another part of the envelope

Now for the Real Directions:
1. Have ready your completed Doll invite (dolls, poems, and belly band wrap)
2. Place a piece of 12x18 construction paper on the table in the color of your choice.
3. Place the Doll Invite onto the paper all the way to the ends, but leaving about 1/4 inch on the right side and and at least 1 to1 1/2 inches on the bottom. Thats where the glue will go later on and where it will fold over.

           *Notice how close the doll is to the end on the right and how much more is left at the bottom*

4. Fold the excess paper thats on the left side over the doll to determine if and how much excess paper needs to be chopped off. In my case, I precut mine to the shape I needed but the second picture below is a pic of the excess paper being cut off.

*The right side is what I measured out for the Invite and the left side was the excess that I eventually cut off and used to make the belly bands.*

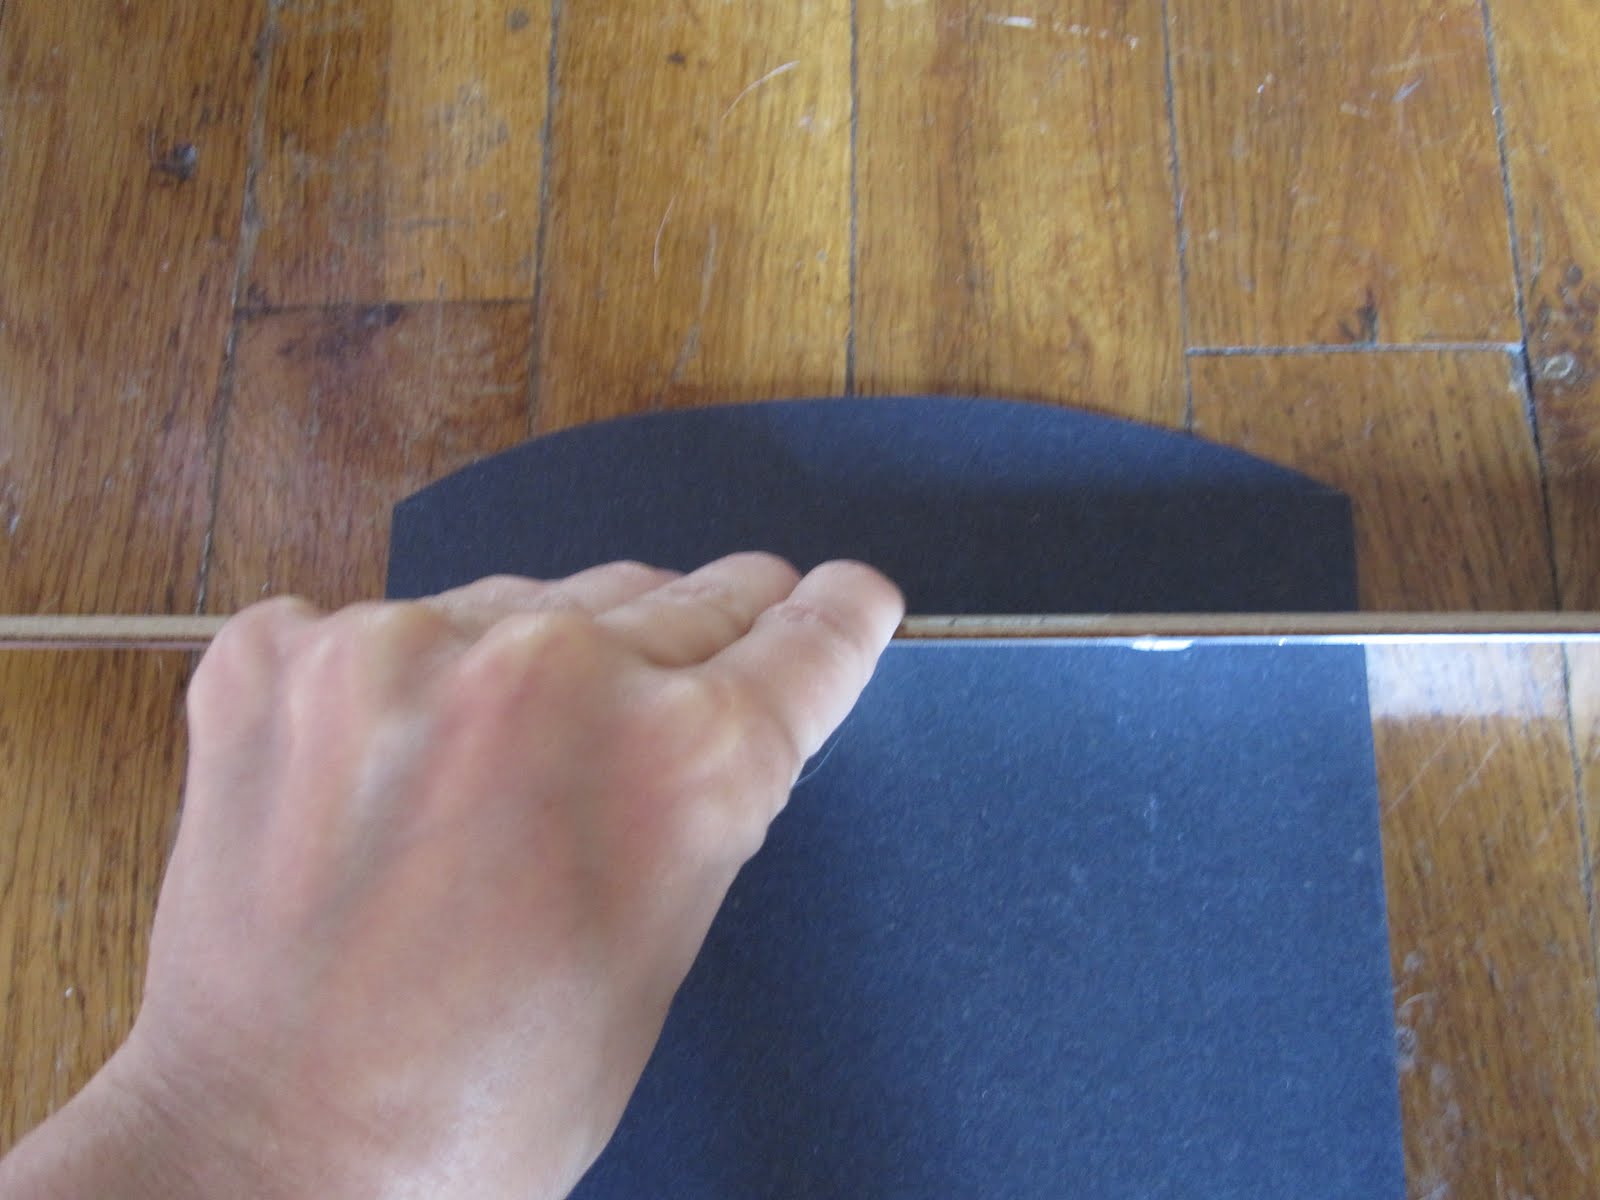
5. After cutting off any excess, measure out how much paper you want at the top. **Remember that the top needs to be longer than just 1/4inch. I would leave 1 to 1 1/2 inch because you will want to fold it over to make it look like an actual envelope.

*Once again, cut off any extra paper that wont be needed. The rectangle that is left will eventually become your envelope! Even though it doesnt look ike much now, youll be shocked at the end result!*

6. Place Invite back onto the cut paper, leaving the room on top, bottom and right side. Mark on the paper with a pencil where you will make the fold.
7. Take a ruler, or just do it free hand, and fold paper over creatin a crease where marked

                     *I use a ruler to give me a nice clean line, but you do not need to do it with one*

8. Flatten the paper out again somewhat, but you should have a decent crease. Now onto the smaller crease to the right side that we will use as means to glue the envelope together.
9.Find that 1/4inch space we left on the right side of the paper and place the ruler on the 1/4 line in order to crease. Fold paper over.

*This side is harder to do because its a smaller fold.Be careful to go slowly because the paper can rip. Its not that thick.*

10. You now should have two creases in your paper. Does it look like an envelope yet? :-) Prob. not!

11. Place the invite back into the envelope and fold it over to make sure the creases you made hold the card correctly.
12. Once it fits correct, leave a decent space at the top and bottom so we can get started on making some cuts and folds.
13. Notice below that once I placed my invite, I drew a line on the left side of my paper at the exact spot the invite ends. This is because we will not be using all this paper and need to cut parts off. (This is where the visualization came into play for me because I had to figure out in my head, how an envelope works which sounds easier than it was)

         *Ok this is where it gets more complicated, so I hope I can explain it good enough. Ill do my best!*

14. The flap on the bottom of an envelop usual can be seen on a finished envelope, which means that in order to get that feel, the bottom part of the right side will be doing the flapping. That extra on the left side needs to be chopped off.
15. Cut on the line you drew and again on the seam of the paper, removing that whole rectangle pieceon the left side.
16.We will now do the same thing to the other, smaller crease. Cut on the crease and again where the end of the invite is, cutting out a small rectangle.

*I did the smaller one first, but it really doesnt matter which rectangle piece one cut out first, they both need to be cut off sooner or later*

                                               *Cut off the rectangle piece, we dont need it*

You should now have cut out both parts that we do not need anymore. You will see why shortly if you are still unsure why we are doing this.


*This is what the bottom of your envelope should now look like.*
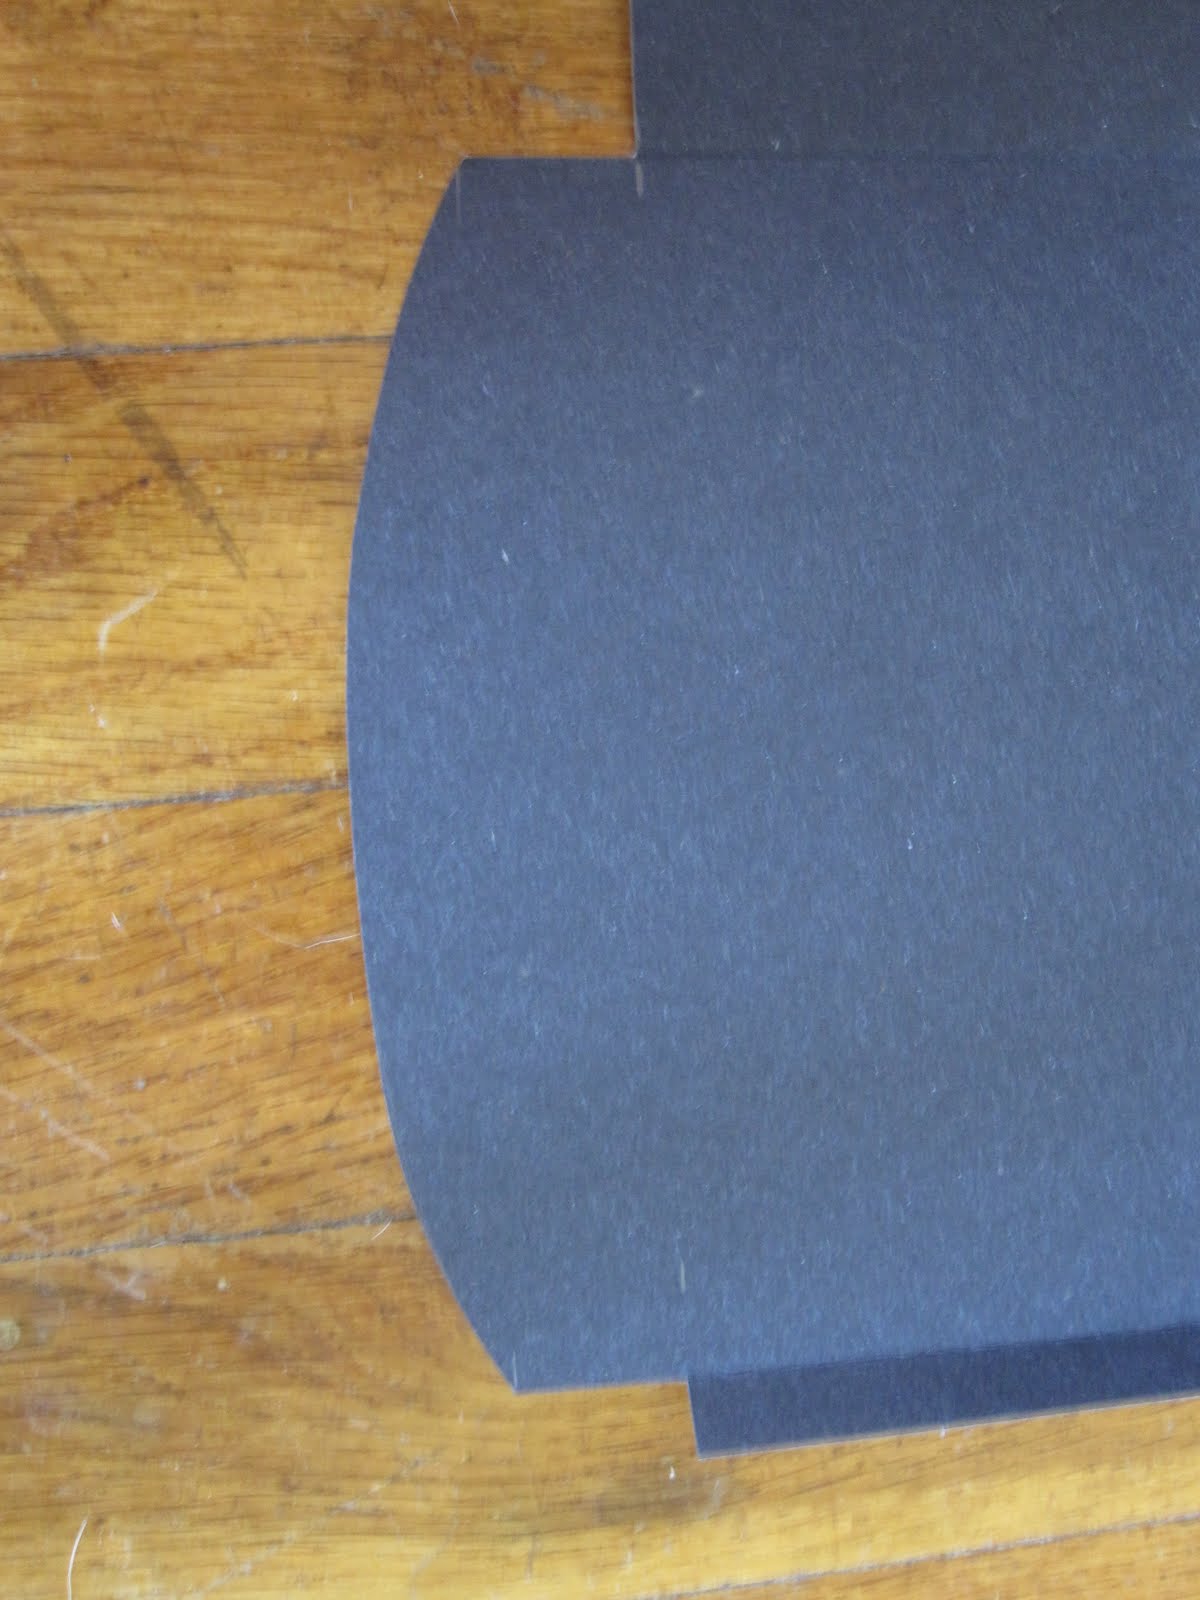
17. Most envelope folds have a soft edge. We need to get rid of the 90degree angles and create a nice looking finish. To do this, free hand a semi-circle basically close to the edge of that flap.See pic below. Start the semi-circle about 3/4 of an inch into the flap than begin to cut so your edge looks like this:


*If you want a different edge, you can create one of your own, it doesnt need to look so standard.


18.Place a ruler on the end of the flap where it will be folded in order to make a nice crease.

*It helps to take that left side of the paper and fold it back over to make the envelope before creasing the flap over. This is because, the flap needs to go over both side of the paper, not just one. If you fold it without both pieces, the crease wont work later on*

19. Fold flap over both sides of the paper.

20.Place invite back into envelope so we can see what we will need to do to the top. The top will eventually look like the bottom. Its basically the same steps.

 
*The ruler is there to help me decide where I will start my semi circle. You can start yours wherever you want*

21. We will need to cut out more rectangles as we did on the bottom. The whole piece above the head will really be the flap so I will cut out my sides about where the ruler is also.
22. You can draw a line across the whole paper at this point too since we will use it momentarily to help us know where to cut.


*Cut the side crease off as we did with out bottom flap*
 
23. Now move onto the other side of the paper and continue to cut out that side.
 
                                             *Cut on the line that we drew all the way across*

*And on that middle crease*
 
*This is what it looks like with all the pieces cut off*

24.Now we have to create the semi-circled edge on this flap. Start the same way we did on the bottom, by marking about 3/4 of an inch and starting our edge there.
 
*The pencil is showing the 3/4 inch gap I left before starting my semi circle. From that point is where I begin my sketch before cutting*

25. Cut out the finished edge to reveal our top flap.

26. Fold the left side of the envelope over again so we can fold the new flap over both sides.
27. Take the ruler and place at edge of flap so you can fold it over the ruler to make a clean crease.

28. Fold flap over the ruler

                                    Starting to look like an Envelope? Now to make it final, Glue!

29. Take the small 1/4 fold to the right and go over the crease to make it crisp.
30. Take glue and put it on the fold from top to bottom.
31. Fold the left side of the envelope onto the smaller fold where the glue is.
32. Press and hold for a few seconds so the paper adheres to the glue.
 
*When it sticks to the glue, your envelope should look like this*


                                                        Starting to take some form isnt it?

33. Glue the bottom flap to the envelope. Bottom flap only! *Do not glue the top flap until Invite is inside-I know that sounds dumb, but ya never know.When your on a roll you may just not be thinking.
 
                                    *After gluing, apply pressue for a few seconds so it sticks*

34. Place invite inside and make sure it goes in easily and comes out easily.

                                                    Admire your hard work! You earned it!

For directions on how to create the belly band name tags for the envelopes, check out my next blog!

Thanks for reading!

Tuesday, September 7, 2010

"Will You Be My Bridesmaid" - Belly Bands for the Doll Cards

The Project: "Will You Be My Bridesmaid?"-Belly Bands for the Cards


The cost: 3.00 ( with paper and initial stickers) or 2.00 if you use left over paper as I did and just buy the stickers. *Get paper from Micheals in the color of your choice, .59-.99*

*My belly-band consisted of a black band, a black square, smaller orange square, and even smaller marble print paper*

*I used all excess paper from my other projects so paper cost me 0.00*

*Initial sticker was bought at Michaels for .99*


The Story
Once again, I got the belly-band idea from the original oncewed.com invite. In the original, the belly band was one solid color and the girls names were stamped on the band using white lettering. Because I made larger dolls and wanted to "go big or go home", I wanted mine to have more detail. I decided on keeping with my "layered theme" and originally was going to print the initials onto the paper in orange instead of the stickers. Once, I found the stickers for $1, I changed my mind pretty quickly. These bands were simple to make, and cost nothing if you use extra paper from other projects. Never throw away your scraps unless they are ridiculously small or damaged! When your on a budget, you'll find ways to use them :-)

First Things First
1. Decide if you are going "simple" or "complicated"
2. If going simple, pick one solid color
3. If going complicated, decide how many paper layers you are using, and what colors they will be
4. Decide if you will use stickers or your printer. *If you cant find stickers on sale, or dont have a coupon for 40% off, I would just use your printer, its not necissary money to spend*

What You Will Need (Sorry no Picture again)
1. Paper - color or colors of your choice (.59-.99 from Michaels or AC Moore)
***Before you go get paper, its important to estimate before you go how big of a piece you would need to cover the whole doll. You dont want to just guess and realize the paper you got is too small. If all else fails, buy the bigger paper regardless. You can always use the scraps later.***
2. Paper Cutter
3. Glue Runner (not just regular glue, it will turn out bumpy for multiple layers)
4. Stickers or a printer (Buy on sale, or get a 40% of coupon to purchase full priced stickers)
5. Your completed Doll Card (Dolls and Poems)
6. Ruler

Step by Step Directions
1. Decide how thick you want your bands to be. *This can be whatever you want, just make it look good depending on what size your dolls are. The bigger the Dolls, the thicker the band will need to be*
2. Make sure your paper will fit around your doll **Leave extra room to glue band together (Ex: if you only need 7inches to wrap the doll, make your paper 8inches to be safe. You can always cut it off later)**
3. Take a ruler and mark out the size you chose (Ex: if you do 1" bands, take your paper and ruler and put a line for every inch so its easier to know where to cut)
4. Put paper into the cutter and cut on your pencil marks the desired number of times (I had 7 girls so I made seven strips)


*Paper placed in cutter at desired size and ready to cut*


*This pic shows only 6 strips because my MOHs Card was a different size than the others and needed a custom size*


5. Take one of your strips and lay it on a flat surface. Take your Doll Card and place it in the middle of the strip. Keep strip high enough on the card also. **Keep dolls facing up**


6. Once Card is on top of the strip, press down on the card so it doesnt move and fold the right side over the Poem and Doll.


7. Hold down the piece you just folded, and fold over the other side onto the rest of the band to make your creases before you glue.


*If you notice where the line overlap is, it is way too far to the right. You will need to just take some scissors and cut the paper so that the seam is in the middle.*

It wont matter if you cut that new seam sloppy because the other squares will go right over it and you dont even see it.


*If you are doing a simplified band, just do the band the same way but face the dolls down on the band instead of up. This way, the seam will be on the back and not the front and it wont matter because who will really see it?*


8. Take your glue runner and glue the bottom of your flap. Place down, and hold a few seconds so it stays.
9. Take your excess paper, or color of your choice, and create a square or ractangle of whatever size you want. Just make sure its big enough to cover the seam.
10. Once you created the square, glue the under-side of it and place over the seam that was in the middle of the band and press down. The seam is gone!


*I used a rectangle but you can choose your own style*


11. Take your next color, and cut out a smaller rectangle or square. The size will depend on how much you want the underlayer to show. (My next color was orange)


*I placed my orange paper onto the square to get a better feel of where I should cut. I always check first so I dont have to cut more than one piece because I messed up*


12. Once you figure out where you want to cut, mark it with a pencil, and cut it.
13. Once cut, use your glue runner to glue the back of it, and put it onto the previous square or rectangle.


*Dont mind where Im pointing, just focus on how the orange on the black now looks*


14. Continue doing this process however many times you decide to based on what colors you are using. I used one more piece, the marble print paper.

**If at this point you are printing out your letters and not using stickers, you will place your last piece of paper into the printer, pick your lettering, letters,sizes, colors and then print out. Once printed out, cut to the appropriate size, cut, and glue***

I didnt everything the same way as I did before since I was using stickers. I marked my paper, cut it, and glued it.

15. Once its glued on all previous papers, take out your letter stickers and start putting them onto the correct invites.

Belly Bands are Done!!!

Hope everyone had some fun, and you can do these with just about anything. Good DIY project to perfect. The more you do, the easier and faster you can make them.

For more directions on other belly bands, such as the envelope bands made of ribbon, check out my other blogs :-)

Sunday, September 5, 2010

"Will You Be My Bridesmaid" - Poems

The Project: "Will You Be My Bridesmaid" Poem (goes behind the Single Doll, or the place of your choice) *Sample Poems at the bottom*

The Cost: ~$10.00 if you already have a paper trimmer or ~$15.00-$20 total if you need to buy it from Michaels(sheets are .59-.99 at Michaels and AC Moore)
*Register for a Michaels account and use coupons that go toward the whole purchase if avaiable. This helps keep costs down on paper* If your not buying paper, use the 40% off coupons on everything else!
**Price will vary based on size of poem cards. Mine were quite large (~7-8 inches) so I only got two out of each sheet, if that. If you go smaller, you can feasibly get 3 or more from one sheet**

These are the fronts of my Poem Cards. They have 4 different papers per card and the MOH got a different version.

 These are the backs of their cards. Since I was working with an Asian theme, I created their names with an Asian Symbol for each girl. I know what you may ask, but don't,, I dont remember what the symbols mean :-)

The Story

Along with the original invite idea from oncewed.com, it showed alittle card asking the girls "Will You Be My Bridesmaid?". I couldn't decide how I could get my writing to look like the one in the picture so I said, what the hell, Ill create my own. I decided to start with colors. What colors did I want to use? I knew I wanted browns and orange as the pop color. Since I scrapbook on my own, I looked to see what papers I already had so as not to spend extra money. I found the marble toned printing paper that I then used to print the poems directly on. The rest of the colors I unfortunately had to go purchase and at .59-.99 a sheet, its not that cheap, but do-able. I then thought about what Id like to write on the cards and I originally was going to create my own saying or story, but that deemed to much work so I began my search for bridesmaid poems. A while variety came up and I picked 7 different ones I liked so that each girl could have their own poem based on out relationship. This is basically how this project came about...Now for how it was made!

First Things First
1. Pick the colors you want for the poem cards (This can be based on your wedding colors, colors you just like, or to match the dress you previously chose-Have fun with it!)
2. Pick the size of your poems (My suggestion-pick a size that is slightly smaller, or exactly the same size as your dolls. So if your dolls were 6 inches high and 3 inches wide, the poem should be that same measurement or somewhat smaller) This makes it easier later on to put the belly band on (I learned that the hard way when I made my MOH card a square)
3. Search your house for usable resources so you dont have to buy new products! Any way to save money is well worth it.
4. Decide if you are doing a back to your cards
5. Decide if you are doing a ribbon at the top

What you will need: Sorry, my poems were made before I realized I was going to do a blog, so I have no pics during creation, just the end product :-(


1. Glue stick or Glue runner (I suggest the Glue Runner-I learned the hard way that the glue will cause ripples in the cards and they will not be flat, looks alittle warped. When I tried the glue runner, I fell in love! I will never use glue again for stacking paper) ~5.00 for the runner and buy the refillable one! Its more upfront but cheaper in long run. You will use alot from the glue runner so maybe buy the 3 pack for 10$
2. Ribbon (.50 from AC Moore)
3. Paper (.59-.99 from Michaels or AC Moore) for backing and for printing on (make sure you can use it in your printer)
4. Paper trimmer (14.99 from Michaels but sign up for 40% coupons and get it for 9.00) (I had one already so its not reflected in my cost)
5. Poems
6. Printer to print poems on paper
7. Hole Puncher (1.50)
8. Colored marker of your choice (1.50)
 Step by Step Directions: I apologize that I dont have step by step pictures, I didnt take pictures during this process and I feel terrible. I know images help, at least for me they do. I will do my best to describe it and maybe I'll go back and make another one so I can put it up eventually for all you guys.

1. Start from the outside in, not the inside out!- Work on the back piece first and then work your way to the middle poem layer, its easier this way.
2. Determine your size, and color order.
3. Once size and color are chosen, take that color and make meaurement points on where the paper is going to be cut (Ex: if its 6 inches high and 3 inches wide, mark 6 inches on one side, and 3 on the other so you know where to trim)
4. Place paper into the trimmer, line the mark up to the cutter, and Slice away!
5. Repeat for the other side as well until you have your 6x3 shape or whatever size you chose.
6. Do this however many times you need to. For me, I did 6 of each layer because my MOH's was different and had to be done seperately

7. Take second color that will be used and decide how much of the first paper you want to be shown. If your back layer is brown, as in my case, and the next layer was the lighter brown, I wanted about 1/4" to be seen of that darker brown.
8. Once you decide how much will be shown, get the new measurements for the next paper. The paper will obviously be getting smaller as you go inward. (if you chose 1/4" then the paper will be 1/4" less on all sides leaving your new paper size to 5 3/4" x 2 3/4" and so on) - Make as many of these as you need, I needed 6 total.

9. If you have more colors to use as I did, keep this process going. If you don't choose to do as many layers, than you will have no need to go any further. Just skip to the Poem layer.
10. For me I had a 3rd layer, the orange, so I measured out how big that sheet would need to be, and placed in the trimmer once again. I did this 6 times.
11. Place all backing layers to the side for now.

Now the Poem Layer! This can be alittle tricky because now you are left with only a certain amount of space that can hold the poem. DO NOT CUT the sizes out for the poem layer because then you will be unable to put it in the printer! You will print first, then cut.

12. Pull up your poems on the computer. Copy and Paste into Word. Choose font, font colors, and sizes.
13. Place 1 poem in the middle of the paper, centered all around to an eye-appropriate size
14. Print.
15. Do this as many times as you need depending on the amount of bridesmaids you have.
16. When printed out, you should have one poem on each page directly in the middle.

I know it seems like a waste of paper because you can probably fit more than 1 poem on a page, but its worth the paper rather than trying to figure out the size you need first. You will most likely print out more paper that way because it will come out wrong each time.

17. Now, determine the actual size you need to fit the poem onto the other backings. Lets say its 3x2, measure around the poem that 3x2 size, mark with a pencil lightly and place in the trimmer.
18. Trim down the poem to the appropriate size or cut alittle at a time to make sure you get the size you will want.

19. Start again from outside, in.
20. Take the biggest size paper and place on a flat surface.
21. Now take the next smallest size, take your tape runner and just go on the outsides of the card to basically create a rectangle line of glue.
22. Flip over and carefull place onto the bigger paper, leaving the same amount of excess on each side so it looks centered.
23. Continue to do this for all backings.
24. When it comes to the poem, do that the exact same way, placing it in the middle of the paper before it.
25. All done! - well with the fronts

If you are not doing a back at all, take your hole puncher, punch two holes on each card at the top for the ribbon. Cut ribbon to an approprate size, larger is better because you can always cut it later. Place one end in one hole, place the other end in the other hole and pull through. Make sure each side is same length and make a knot. I make a knot first because I find itll hold the bow better. Once knotted once, create a bow and cut off any excess ribbon you dont like.

If you are doing a back thats like mine, than continue will my directions. If you are choosing to do your own creation, just have fun with it and its all about trial and error! Dont be afraid to mess up. Once you mess up once, trust me, you wont do it again :-)

26. Decide how many colors you will use for the backing of the name, and/or symbol
27. Start from the outside in again, choosing a color for the largest piece and cutting it to an approriate size that you like.
28. Cut the next color to whatever size you choose and do that for as many sheets of backing as you choose to have.
29. In my case, I used only a backing and then a sheet for the name. I cut the orange to the size I wanted, took the lighter color and cut that as well.
30. Once cut, I glue runnered the back of the name, and centered onto the orange paper. The name matting was done.
31. Write each girls name on the paper using a marker or whatever tool you choose. I used a calligraphy pen and tried to use a unique font of my own. I practiced in pencil first and if I liked it, I went over it with the brown marker.
32. If doing a symbol as I did, the same rule applies. Start from outside and work your way in. Choose your colors, and make them smaller as they go inward.
33. Once completed to how ever many papers you used, create a logo or symbol in pencil first on the paper and go over in marker.

Sample Poems: or google "Bridesmaids Poems" for other great option

Poem 1
The Day, the dress

The Bride, the Groom
The Joy the tears will all come soon

Confusing true love to my husband-to-be
with family and friends all watching me
Pray the sun will be shining down
and that i will fit into my gown

Now there is just one more thing that is left to be and thats to have you standing with me...
Will you be my bridesmaid?

Poem 2
I will always fondly remember the special times we shared.
You've laughed with me you've cried with me
and always shown you care.
So on that joyful day in "June" when I will be a bride,
I would be honored as well as priveleged to have you by my side.

Will you be my bridesmaid

Poem 3
Through the in's and out's
And thick and thin
No matter what's happened
There've you been

you smile when i need it
and listen when i grieve,
you hug me when i cry-
and blow boogers on your sleeve

I treasure you friend
More than diamonds or gold,
and i promise i wil
when we are saggy and old

So please stand by my side
when i say "I DO"
for I wouldn't be me
without a friend like you

Poem 4
You've shared with me the special times,
our friendship grows each day,
We've shared our secrets and our dreams,
and laughed along the way.

And now at this most special time
as my wedding day nears,
I would like to have you by my side
to calm some jitters and the fears.

When I am walking down the aisle
a very happy bride,
It would mean so very much to me
to have you by my side.

Will you be my bridesmaid?

Poem 5
You have always been there, more than just a friend.
You know just who I am and everywhere I’ve been..

You’re the one who I can turn to, any hour of the day.
Seems, I only have to think of you and you’ll be on your way.

No matter where life takes me, no matter where I roam.
When I’m with you’re my friend, my heart feels right at home.

So on my wedding day I will need you more than ever
Please say you’ll be my bridesmaid now…

And my friend forever.

Poem 6-MOH
To get ready for a wedding, there's just so much to do,
from choosing bridesmaid's dresses, to finding something blue.

I see so very clearly, how this wedding's only one,
of the many times you've helped me, when things needed to be done.

Simply to say thank you, just doesn't seem to share,
the feelings here inside me, when I see how much you care.

You are so very special and my heart is grateful for
the friendship that we share and will be forevermore.

Thank you for adding joy to my life.

Will You Be My Maid of Honor?